Frequently asked questions
order support
SHIPPING
What is your shipping policy?
FAST FREE SHIPPING ON ORDERS OVER $60.
We're proud to have some of the fastest shipping times in Australia.
We ship every weekday from Sydney. if you place your order before 12 pm, we’ll aim to dispatch it the same business day.
free regular eParcel Over $60 - often very quick local shipping from Melbourne.
shipping options and prices vary depending on the delivery address. our shipping provider provides dynamic pricing to your door. to confirm the shipping cost for your order, add your items to cart and then enter your shipping address in the checkout. shipping price and options will be displayed on the checkout page for you.

tracking updates will be sent to your email address. you are encouraged to contact the postal company directly with your tracking info if you have any questions about location or redelivery once your order has been shipped.
Where do you ship to?
Australia & New Zealand.
Where is Minbie's HQ?
4/54 wellington st, collingwood vic 3066
What if I'm ordering outside of Australia?
currently, we only ship we sell and ship from australia, uk & usa via 3 independent stores:
it says it's out of stock?
if the items you currently want are out of stock, please be assured that new stock is on its way and will soon be available.
RETURNS, REPLACEMENTS, CANCELLATIONS
what is the returns policy?
For hygiene reasons, we are unable to accept returns of minbie teats, bottles, soothers, breast pumps, warmers, sterilisers or any accessories once they have been opened. any used products cannot be returned. if you have an issue with a product or believe it to be faulty, please contact our customer service team at info@minbie.com.au
Unused & unopened products can be returned within 30 days of receiving the order. to start the returns process an email must be sent to info@minbie.com.au. if your return is not a result of a minbie error, original shipping fees will not be refunded. we will provide you with a return shipping address to ship your goods to.
All minbie products are factory sealed over the openings of the box. if these seals are broken, the item cannot be returned. please send photos of the outer box or shrink-wrapped pack, showing the box sealed over the opening on the top and the bottom. when photos that clearly show the packaging intact are received, the return will be approved. you’re required to send the order back to us within the 30 day return time.
All returns go through a returns-check process that can take approximately two weeks to be completed.
How do refunds work?
Change of Mind Returns
Changed your mind? No worries at all, we are here to help! Please reach out to our team at info@minbie.com.au within 30 days of receiving your delivery.
To keep all our little ones safe, items must be:
- Completely unused.
- In their original, factory-sealed packaging.
- Approved by our customer care team before being sent back.
(Because we provide feeding products for precious newborns, this ensures every family receives items that are 100% hygienic and safe!)
A quick note on shipping:
- Standard Returns: Customers are responsible for both the original shipping cost and the return shipping cost.
- Free Shipping Orders: If your order qualified for Free Shipping, the original shipping cost incurred to send your parcel will be deducted from your refund.
Why do we do this?
As a family-focused business, shipping and fulfillment costs go directly to our hardworking couriers and can't be recovered once a package leaves our warehouse.
To help make your return as easy as possible, we will completely waive our usual picking and restocking fees.
By sharing only the actual transit costs with us, you help us keep our premium product quality high and our prices fair for all Minbie families.
We truly appreciate your understanding and support!
replacing faulty damaged or missing minbie products
Please contact info@minbie.com.au to discuss the problem. The product will be replaced providing it is under warranty and deemed not to have been tampered with or damaged through incorrect use.
If there are items missing from your order please contact us within 14 days of placing your order.
how do I cancel or make changes to my order?
We process orders as soon as they come in thus the cancellation window is very narrow. If you wish to make changes or cancel an order please contact us immediately upon placing the order.
Once an order has been processed/shipped no changes can be made to the order. The order can be returned upon receipt of it.
Please follow the procedures listed under returns policy to make a return.
when will i get my order confirmation?
An order confirmation email is sent after each order. the email is sent to the one used when placing the order.
If you cannot find this email please check your junk/trash folder. if you are still not finding it contact our customer service team for assistance.
do you send free samples?
Due to the demand for our current stock, we are unable to offer samples.
WARRANTY OF ELECTRICAL PRODUCTS
WARRANTY OF ELECTRICAL PRODUCTS
All our electrical products including breast pumps, sterilisers, and warmers come with a 1-year warranty. If your baby is due within the next four months, we can start your 1-year warranty from your baby’s birth date instead of the purchase date, giving you more coverage when you actually start using your product.
To activate your warranty, simply email info@minbie.com.au.
product support
WHY CHOOSE MINBIE
what are the benefits of Minbie?
Minbie's unique functionality provides practice for babies to latch properly onto the breast, this is exceptionally supportive of the mother-baby breastfeeding bond and is anti-mastitis. you can read more about this here.
Minbie's functionality also supports the immature digestive system of babies, and is anti-colic and anti-reflux.
You can rest assured that babies feeding from minbie are feeding from a premium-quality soft, flexible silicone material that contains no nasties.
when can i introduce minbie to my baby?
Minbie can be introduced at any baby age.
To help you protect their natural and best breastfeeding technique, we recommend using minbie as the first bottle for postnatals.
Breastfeed if possible for the first 6 months+
Minbie's familiar breastfeeding-latch & motion has helped a lot of exclusively breastfed babies to accept a bottle, and this has been a lifesaver for breastfeeding mothers who need a break, more sleep or need to go back to work.
For weaning, minbie has helped many older breastfed babies to accept a bottle and begin feeding independently. our award-winning bottle is ergonomically designed to be easier for them to hold.
What is the main benefit of using the Minbie bottle system?
Minbie's unique functionality provides practice for babies to latch properly onto the breast, this is exceptionally supportive of the mother-baby breastfeeding bond and is anti-mastitis. you can read more about this here.
Minbie's functionality also supports the immature digestive system of babies, and is anti-colic and anti-reflux.
You can rest assured that babies feeding from minbie are feeding from a premium-quality soft, flexible silicone material that contains no nasties.
My baby refuses all bottles. How is Minbie different?
Bottle refusal is very common and minbie has helped thousands of families who’ve struggled to introduce a bottle. this success is down to the shape of the minbie teat which feels familiar to exclusively breastfed babies.
Minbie is a new technology, babies who feed from the minbie are practicing their instinctive breastfeeding muscle-memory. they’re practicing to latch properly onto the breast and to work for the feed with their complex and instinctive (and incredibly special) breastfeeding technique. this technique is what evolution provided for our babies, for their very survival, and is the best for protecting the longevity of the mother-baby breastfeeding relationship!
here is a great article on overcoming bottle refusal with minbie.
How is Minbie better for breastfeeding than generic teats?
Finding the right bottle & teat to support your breastfeeding journey is critical, not only to ensure that there is no confusion when switching between breast and bottle but also to avoid issues such as lazy feeding and weak latching.
Using minbie as the first and only teat when bottle-feeding will help you to protect your baby's precious, natural, instinctive breastfeeding latch & motion. generic nipples don't train babies to breastfeed with a proper latch and can quickly harm a baby's ability to breastfeed, resulting in the bottle taking-over. read more on this here. babies who latch and feed from the minbie are practicing to return to the breast with a perfect breastfeeding latch and with the feeding motion that best supports their mother's milk-supply.
Minbie is unique and offers exceptional support for the mother-baby breastfeeding bond. No other teat looks or functions like the minbie.
How does Minbie help babies who can't be breastfed?
Minbie provides a high-quality feeding experience that nurtures your baby’s natural feeding stage.
When your baby feeds from the minbie they’re practicing the best feeding technique for their digestive system and for their natural suckling and jaw-complex development.
what is the minbie teats made from?
All minbie teats are made from premium-quality soft, flexible, BPA-free silicone sourced from germany. our designers have many years of experience in the infant feeding area and every care is taken during manufacturing to ensure the highest quality of our products. our teats comply with all australian safety requirements.
is minbie sold in stores?
To provide you with the very best customer support and interaction minbie is sold directly on our website.
the minbie nipple
TEAT DESCRIPTION & SIZES
what is the Minbie teat made of?
All Minbie teats are made from premium, soft, flexible, BPA-free silicone sourced from Germany. Our Australian designers have many years of experience in infant feeding, and every step of manufacturing is carefully monitored to ensure the highest quality. Minbie teats meet Australian, European, and US safety standards.
How do I choose the right flow for my baby?
Our teats are carefully calibrated for specific age groups. We recommend Minbie feeding kits because they include more than one flow size, giving you flexibility as your baby grows.
Each kit provides two nipple sizes within your baby’s age range to help you find the best fit for your little one.
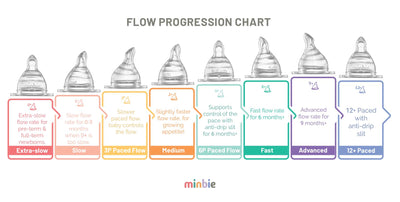
Minbie teat flow sizes
Minbie teats come in a range of flow sizes to suit your baby’s age and feeding needs:
- XS Extra Slow (0+) – The slowest flow, suitable for newborns and preemies.
- 1+ Slow – For when XS becomes too slow.
- 3P Pace Flow – Between slow and medium; typically used from around 2 months, depending on your baby’s needs.
- 3+ Medium – Follows 3P, generally used up to 6 months or longer.
- 6P & 6+ Fast – For babies around 6 months.
- 9+ Advanced Flow – For older babies needing a faster flow.
- 12 Month+ Flow – Perfect for older babies who require a more substantial, faster flow.
Each teat is designed to support your baby’s natural feeding instincts while keeping transitions smooth between breast and bottle.
everything you need to know
how is minbie better for breastfeeding than generic teats?
Use Minbie as the first and only teat when bottle-feeding to protect your baby’s natural, instinctive breastfeeding latch and feeding motion. Generic teats can train babies to feed differently, which may affect their ability to breastfeed and can lead to the bottle taking over.
You can see a comparison between Minbie and generic bottle teats on our page.
can minbie help with colic and reflux?
Yes, Minbie can help. a key reason for infant reflux and colic is the underdeveloped digestive system.
Therefore, the way a baby draws the milk and swallows is very important. Minbie’s revolutionary anti-reflux and anti-colic teat offers superior support of the ability of babies to digest the milk and direct latch breastfeed for the comfort and sustainability of breastfeeding.
You can read more about colic here and reflux here.
which way up does minbie go?
The flatter side of the nipple goes against your baby's upper gums and the roof of their mouth. you will notice the air-valve will be facing upwards. please follow the instructions that come with all packs to help you use the Minbie correctly.
Contact info@minbie.com.au or jump online to chat to one of our 24/7 customer service team if you have any questions.

What are my baby’s feeding cues?
By describing what’s happening when your baby feeds, you can get a good indication of whether they need to move up or down a flow size. These subtle signs are known as ‘feeding cues’:
- Does your baby feed fast and strong?
- Do they like to take time over a feed, pausing a few times throughout? Perhaps your baby is straining to get the milk out of the teat fast enough or it’s coming out so easily that it is flooding your baby's mouth.
- Is your baby happy feeding from the nipple or are they fussing and seeming frustrated?
Observing these cues can help you decide if your baby needs a slower or faster flow. If you’re unsure, our customer service team is happy to help you find the right Minbie teat for your little one.
How can I encourage my baby to take a bottle?
Here are some tips to make the transition easier:
- Offer the bottle when your baby is relaxed and hungry, such as right after a sleep.
- Hold your baby upright at the start of the feed and keep the bottle at a horizontal angle so milk doesn’t drip.
- Encourage a wide mouth: Gently touch the top lip and upper gums with the teat to prompt your baby to open wide before latching.
- Correct positioning: When your baby latches, the upper surface of the nipple should rest against the upper gums and roof of the mouth (palate).
- Avoid gagging: Do not insert the nipple too far or place it on the tongue.
- Check the latch: Make sure your baby’s lips are wide and the nipple is in the palate area, just like proper breastfeeding. If the latch is shallow (nipple behind the front gums with lips not wide), stop and try again.
Important: Make sure your baby latches the nipple onto the palate area, just like proper breastfeeding, with a wide latch around the lips. If the latch is shallow, with the nipple behind the front gums and lips not wide, stop the feed and try offering the bottle again.
what is pace feeding?
Pace feeding encourages babies to feed more slowly, giving them control over the flow of milk. All Minbie teats are designed for pace feeding. When babies latch and feed from Minbie, they work for the milk, naturally controlling the feed rate.
The “P” stands for Paced, a slower flow that helps your baby stay in control and mimic natural breastfeeding.
The “+” teats have a faster flow, which can be useful when your little one is ready for quicker feeds.
What size bottles does the Minbie nipple fit?
The minbie teat is compatible with a number of standard wide-neck baby bottles (49.5mm - 50.5mm outer neck diameter), however, we always advise that the best feeding outcomes are seen when both our bottle & nipple are being used together.
Caring For Your Minbie
Get the most out of your Minbie products
How do I clean the teats?
To clean Minbie teats it’s important you carefully wash them in warm soapy water, rinse thoroughly, then sterilise and allow to air-dry.
We recommend either our amazing steam steriliser, bottle washer & dryer or our UV steriliser to kill the germs on your bottles then dry them ready for the next use.
- Do not clean in the dishwasher. If using a dedicated sterilisation unit, microwave bags or sterilising liquid follow the instructions carefully.
- Check that the teat and ventilation openings are clear. These are delicate so clean with care so as not to damage them.
- Do not leave nipples soaking as they may become cloudy or weakened.
- Do not use a bottle brush to clean the teat.
how do i prevent leaks?
The minbie teat is made of premium-quality soft flexible silicone, so it’s important to follow the instructions to ensure you get the best use of the product, longevity and also understand how to prevent leaks
When assembling the bottle, first attach the nipple to the collar, making sure it’s sealed against the inside rim of the collar; then attach the collar firmly to the bottle. Hold the bottle horizontally when offering it to your baby so that it doesn’t drip milk before bub latches and begins feeding.
how often should i replace the minbie teats
Minbie teats last very well when the instructions for cleaning and use are adhered to.
Generally, it is recommended to replace teats every 2-3 months or at the first signs of wear and tear. In the event of any damage please dispose of the nipple immediately and replace it.
Minbie Dummy
your questions answered
What Age Is This Dummy Suitable For?
It’s suitable for babies from premature age up to 2 years old, but we know that many parents love using it even beyond that age, as long as it’s still comfortable for your little one.
How Often Should I Replace the Dummy?
We recommend replacing your baby’s dummy every 2–3 months, or sooner if you notice any signs of wear, to ensure it remains safe and effective.
For your little one’s safety, carefully inspect the dummy before each use by gently pulling the teat in all directions. If you notice any signs of damage or weakness, discard it immediately, as a torn or damaged dummy can present a choking hazard.
How Is the Minbie Dummy Designed to Support Oral Development?
Our dummy features an orthodontic teat thoughtfully shaped to support calm, natural transitions from breast to sleep.
The koala-shaped shield rests gently against delicate skin, with generous airflow to help reduce irritation.
The orthodontic teat works in harmony with your baby’s natural feeding reflex, supporting healthy development of the gums and palate.
What’s the Best Way to Clean My Baby’s Dummy?
Clean the dummy before each use. Wash in warm, soapy water and rinse thoroughly.
You can then sterilise the dummy using standard methods recommended for baby bottles and teats:
- Boiling: Place in boiling water for 5 minutes. Ensure the dummy does not touch the sides of the pot, as direct contact with heat may cause damage.
- Steam or UV steriliser: Use a dedicated steam or UV steriliser, following the manufacturer’s instructions. (Please avoid prolonged UV exposure, as this may reduce the lifespan of the silicone.)
- Sterilising solution: Immerse in a baby-bottle sterilising solution according to the product instructions.
Please note that prolonged UV sterilisation may cause silicone to become sticky over time and reduce the life of the dummy.
Hospital Grade Pump
your questions answered
What are the different stimulation and expression modes?
- Stimulation mode has 8 adjustable vacuum levels
- Expression mode has 10 adjustable vacuum levels
- Expression mode has 5 adjustable frequency levels
What does ‘Hospital Grade’ mean?
The Minbie breast pump is hospital-grade which speaks of its power, efficiency and durability. It has multiple stimulation and expression levels to choose from, all safe and designed with your comfort in mind. The advanced pumping features and silicone shields on the breast, allow powerful yet comfortable pumping.
How do I clean my Breast Pump parts?
Use warm soapy water for the parts that come into contact with the milk (not the white cap, not the tubes, not the pump). rinse thoroughly, then sterilize and dry.
all parts must be completely dry before assembling the pump.
- Do not use any implements or cloths when washing the breast pump parts, as they may tear the delicate silicone parts.
- If there is a build-up of scale, wash the parts in a mixture of white vinegar and water.
how does the light work?
The pump can be used with or without the backlight. There are 3 modes to operate the light:
1. The light can be turned off
2. The first touch turns on the dimmer light
3. The second touch turns on the brighter light
Double or single pumping? How do I get the best suction strength?
- When you're single pumping, the opening for the double pump should be plugged. if it’s not plugged the suction strength is reduced.
- When the pump is used as a double pump the suction strength is not as strong as when single pumping but is still strong enough to pump well.
- The maximum pump time is 30 minutes. the pump will automatically stop after 30 minutes of pumping. the pump can be turned back on but it's not recommended to pump for longer than 30 minutes in one session.
How do I know which settings on the pump are right for me?
A little bit of experimentation helps as you get used to pumping, your milk supply at different times of the day and what feels truly comfortable for you.
The best levels for expressing your milk and how the pump works:
- When the frequency is on a high setting, put the suction on a middle or lower setting
- When the suction is on a high setting, put the frequency on a middle or lower
- For expression mode, always start with both the frequency and the suction strength low, then build slowly.
N.B. if there is any soreness when pumping, the settings should be reduced. if there is pinching, use some breast milk or a nipple cream on the nipple and areola so that the breast does not stick to the silicone.
Can this pump help to increase my milk supply?
Expressing can help stimulate the breasts to increase milk-supply, although milk supply does tend to vary for every mother. As you know, the key to producing breast milk is good nutrition and staying sufficiently hydrated (so make sure you drink lots of water). This, combined with consistent breastfeeding and/or expressing will help.
It’s important you prepare your body for pumping. it’s similar to when feeding your baby, the supply is generally built up around the times when your baby normally feeds. Sufficient time is needed for your milk supply to build back up after a feed.
To help build supply, after expressing, go back into stimulation mode for 2-3 minutes to help give the message that more milk is needed.
For more on pumping read this helpful article and if you’re trying to build your milk supply read this.
how often should i pump
The frequency of pumping depends on your needs and how much you want in storage or to hand. Frequency also depends on why you are pumping. Some mums pump to build up storage while others want to increase production or to simply let dad feed bub.
Here is a guide we have on pumping that may help with your decision.
A lactation consultant is a good source for assistance with pumping and milk production.
Do you have a flange and shield size guide?
Please note when feeding and expressing, the nipple size may increase.
- Your nipple needs room to move in the nipple area of the shield so the size of the shield's nipple area should be bigger than your nipple diameter.
- Always centre the nipple shield with your nipple in the middle where it’s able to move freely so your milk-ducts don't get blocked.
- The minbie pump comes with a 25mm (L) nipple which fits most mums. we suggest you try this size first to see if the nipple moves back and forth in the funnel without sticking.
- The areola should be mostly supported by the shield, but it's okay if some are drawn into the nipple area.
If it’s comfortable and the milk is expressing, it’s a good sign.
How do I measure my nipple?
Measure the diameter of the nipple where it meets the areola. don't include the areola.
There are 3 minbie shield sizes available from the website:
- 21mm (M) for nipple diameter size up to 17mm
- 25mm (L) for nipple diameter size up to 21mm
- 2mm (XL) for nipple diameter size up to 25mm
Signs Your Pump Parts May Need Replacing
With regular use, the softer silicone parts of your Hospital Grade Breast Pump naturally wear down over time. This includes the Silicone shield+ valve and diaphragm, which are essential for maintaining strong, comfortable suction.
We recommend replacing these parts every 2-3 months, or sooner if you notice signs of wear, damage, or reduced suction. Even small tears can affect performance.
The duckbill valve is the most delicate component. When removing or reattaching it, hold the thicker silicone section above the valve and use the pull tab to help prevent tearing.
Our Expression Kit includes all essential spare parts and offers better value than purchasing them individually.
BREAST PUMP TROUBLESHOOTING
how do i look after the tube connectors?
a) If the connector does not fit snugly, try the spare set that comes with the pump.
b) The connector should not be sterilised
c) If the tubes are sterilised, you must ensure no water at all is left in the tubes when it’s connected to the pump.
N.B. The tube and connectors do not come in contact with the milk so don’t need to be sterilised. The tubes can be stored in a dust-free area in a container or bag to keep them clean.
my pump isn't working what should i do?
Diaphragm —how it functions when pumping correctly:
The diaphragm goes up and down when pumping. this can be seen and heard.
When in expression mode the diaphragm may not function properly if both the suction and frequency strength are at the highest setting. If both are set on high it doesn’t allow time for the diaphragm to fall back in place (it will jam) and in this instance the suction will not be effective.
- The higher the suction is set the lower the frequency should be set and vice versa
- The frequency should be around 38. this gives it time for the diaphragm to fall back into place.
- If the breast pump is properly assembled, the diaphragm should be heard and seen going up and down when pumping.
Wearable Pump
your questions answered
Choosing the Right Flange Size
Your Minbie Wearable Pump comes pre-assembled with a 25mm silicone cushion. We’ve also included three additional inserts in 21mm, 17mm, and 15mm so you can find the most comfortable and effective fit for your body.
- 15mm insert suitable for nipple size 11 to 13mm
- 17mm insert suitable for nipple size 13 to 15mm
- 21mm insert suitable for nipple size 15 to 19mm
- 25mm cushion suitable for nipple size 19 to 24mm
For the best fit, we recommend measuring and referring to our sizing guide before selecting your insert.
Signs Your Pump Parts May Need Replacing
With regular use, the softer silicone parts of your Wearable Breast Pump naturally wear down over time. This includes the valve, diaphragm, and silicone inserts, which are essential for maintaining strong, comfortable suction.
We recommend replacing these parts every 2-3 months, or sooner if you notice signs of wear, damage, or reduced suction. Even small tears can affect performance.
The duckbill valve is the most delicate component. When removing or reattaching it, hold the thicker silicone section above the valve and use the pull tab to help prevent tearing.
Milk Collector Care and Cleaning Guide
Cleaning
- Rinse in cool water straight after use to remove any milk residue.
- Soak in warm, soapy water (40–60°C) for 3–5 minutes, then wash thoroughly and rinse well. Remove from the water promptly after cleaning.
- Alternatively, place the parts on the top shelf of the dishwasher.
Sterilising
- Steam sterilise or boil for up to 5 minutes.
- Allow all parts to air-dry completely after sterilising.
To help keep your milk collector in excellent condition, we do not recommend microwaving or repeated UV sterilisation, as this may reduce the lifespan of the materials.
WEARABLE PUMP TROUBLESHOOTING
Why Is Milk Leaking from My Pump?
Leaking is usually caused by parts not being fully aligned, overfilling, or positioning during use.
Please check the following:
- Ensure the diaphragm and duckbill are attached before inserting the shield body into the motor. Listen for a gentle click.
- Screw the bottle on gently and stop if you feel resistance. Realign and try again.
- Do not over-tighten. The bottle should sit straight and aligned with the motor.
- Avoid overfilling the bottle. If milk exceeds the recommended capacity while pumping, it can overflow into the shield body and potentially into the motor.
- Try to remain upright while pumping. Leaning forward may cause milk to pool behind the diaphragm and be drawn into the motor, which can damage it and stop it from working.
If you have checked the above and your pump is still leaking or misaligned, please contact our team at info@minbie.com.au and we will be happy to assist you.
Why Did My Wearable Pump Bottle Crack?
Cracking can sometimes occur if the bottle is mis-threaded when being attached to the wearable motor.
To help prevent cracking, please follow these assembly steps carefully:
- Insert the shield body into the motor with the diaphragm and duckbill already attached. You should hear a gentle click when it is correctly in place.
- When attaching the bottle, screw it on gently. If you feel any resistance, stop and realign before trying again. Forcing it may cause the bottle threads to crack.
Avoid over-tightening. The bottle is correctly attached when it sits straight and aligns neatly with the pump motor.
Why Aren’t the Buttons Working on My Wearable Pump?
It looks like your wearable pump might be in screen lock mode. If no changes are made after 30 seconds, the screen will automatically lock.
To unlock it:
- Press any key
- Then short press the + and - buttons at the same time
My Pump Has Low or No Suction
- Ensure a complete seal — your nipple and areola should sit fully inside the shield.
- Check that no air is escaping. (Placing a finger further down the flange won’t create suction.)
- Start on the lowest setting and increase gradually if needed. Higher settings aren’t always more effective and may reduce suction performance.
- If milk hasn’t started flowing, switch back to stimulation mode to help trigger let-down before returning to expression mode.
- Make sure all pump parts are clean, dry, and assembled correctly to maintain a proper seal.
My Pump Won’t Connect — What Should I Do?
To connect your pump, please follow the steps outlined in your instruction manual under App Control on pages 19 to 23.
This section provides a step-by-step guide to pairing and setting up your pump in the app.
If the app is unable to find or connect to your pump, please check the following:
- Go to your phone’s Settings > Location and ensure Location Services are turned ON.
- Go to Settings > Apps > Minbie App > Permissions and make sure Location access is enabled.
Location permission is required for Bluetooth pairing.
If you are still having trouble connecting, please don’t worry. Simply send us a message and our team will be happy to help you get set up.
Waterless Warmer & Mixer
your questions answered
How does a Waterless Bottle Warmer & Mixer work?
The Minbie Waterless Bottle Warmer & Mixer gently warms breast milk to the perfect body temperature in just 6 to 10 minutes.
Using advanced 360° hot air circulation, it heats evenly without water and helps protect the delicate nutrients your baby needs.
Milk is warmed to 37 to 40°C to preserve probiotics and key nutritional properties. This is especially important for newborn, preterm, or unwell babies. The easy-to-read digital display allows you to monitor the temperature for added peace of mind.
It also features an automatic mixing function to smoothly dissolve formula, helping reduce clumps and air bubbles.
The warmer is compatible with PPSU, PP, and glass bottles, and fits most standard and wide-neck bottles.
Every feed is made safe, simple, and stress free.
Does it work with all baby bottles?
Compatible with a wide range of bottle materials, including PPSU, PP, and glass.
The Waterless Warmer & Mixer is designed to fit bottles with a diameter of 52–65 mm and 65 mm+, making it suitable for most standard and wide-neck bottles.
Which button do I press to warm milk?
If you are warming milk or water from room temperature, select the Room Temp setting by pressing the warming button once.
If you are warming milk from the fridge or freezer, select the Low Temp setting by pressing the warming button twice.
Once selected, the warmer will display the estimated time needed to reach your desired temperature.
The bottle will automatically rotate every 30 seconds to help evenly distribute heat for consistent and gentle warming.
Which temperature setting should I use?
39°C is the recommended temperature setting.
This is close to natural body temperature, making it safe and comfortable for your baby.
You can also find this information on page 2 of the instruction manual.
Can I warm milk in a pouch?
The Minbie Waterless Bottle Warmer is designed to warm milk or water that is already in a bottle. It is not suitable for defrosting or warming frozen breast milk in storage pouches.
The warmer works through direct contact with the bottle and should only be used with bottles, as outlined in the instruction manual.
For best results and safety, always transfer milk into a compatible bottle before warming.
How long does it take to warm milk?
Warming time varies depending on the bottle type, milk volume, and starting temperature. The Waterless Bottle Warmer & Mixer automatically calculates and displays a guide time to help you plan.
Breast milk is warmed gently and slowly to protect nutrients and prevent overheating or hot spots. Because of this careful process, warming may take longer than rapid or boiling-water methods.
For refrigerated milk, we recommend placing the bottle in the warmer around 30 minutes before feeding so it can gradually reach body temperature, approximately 37°C. Some parents choose to place the bottle in earlier during the night for added peace of mind.
The focus is safe, slow, and even warming rather than speed.
Mini UV Steriliser
your questions answered
How Many Dummies Can the Mini UV Steriliser Hold?
You should not place more than two dummies in the Mini UV Steriliser at a time. Make sure each dummy has unobstructed access to the UVC light for effective sterilisation.
Mini UV Steriliser: How to Clean It Safely
The Mini UV Steriliser is not waterproof. To clean it, wipe the surface with a towel and remove any water droplets to prevent moisture from damaging the circuitry.
After each use, clean the interior to remove water marks or stains, and always store the unit in a clean, dry place.
When not in use or during travel, keep the steriliser in a storage bag to protect it from dust and scratches.
What Do the Lights on the Mini UV Steriliser Mean?
The Mini UV Steriliser has two operation modes:
- 59-second mode: Press the power button once. The indicator shows a blue breathing light.
- 3-minute mode: Press the power button twice. The indicator shows a green breathing light.
To stop a cycle: Press the power button three times. The indicator light will turn off.
Charging: Plug in the unit. While charging, the indicator shows a blinking blue light. Once fully charged, the blue light stays solid.
Low Battery: If the unit needs charging, the blue light will blink five times quickly.
Mini UV Steriliser Troubleshooting
Why Isn’t My Mini UV Steriliser Turning On?
Has your Mini UV Steriliser been bumped, dropped, or exposed to water? If not, and it still won’t turn on:
- Check the battery: The power may be depleted. Plug in the unit and charge it fully.
- Check the power source: Try a different power outlet or cable to rule out issues with the power supply.
If the unit still does not respond after these steps, contact customer support for further assistance.
UVC Light Won’t Turn Off After Opening the Lid
If the UVC light does not turn off when the lid is opened, try the following:
- Check the cover detection switch: Wipe it clean with a cloth to remove any dirt or debris.
- Inspect the rubber column of the upper cover detection switch: If it is broken or the internal circuit is damaged, do not use the appliance and dispose of it safely.
UV Steriliser & Dryer
your questions answered
How To Use The Minbie UV Steriliser
Here’s a simple guide to the icons and main functions on the Mini UV Steriliser:
Icons:
- Milk bottle icon: Yogurt-making mode.
- Fruit icon: Fruit/vegetable dehydration mode for drying snacks.
Main Functions:
- UV Function: Sterilises using UV light only.
- Dry Function: Dries items using warm air only.
- Auto Function: Sterilises and then dries items in one complete cycle — ideal for everyday use.
- Storage Function: Keeps items fresh by running brief sterilisation and drying cycles every few hours. Useful in humid environments. If items are already dry, continuous use isn’t necessary.
Note: Repeated UV exposure over long periods may reduce item lifespan, so use as needed.
How Many Bottles Fit in the UV Steriliser?
You can fit up to 9 bottles in the UV Steriliser, or about 4 bottles along with pump parts, teats, diaphragms, and other smaller items.
Tip: Avoid placing items directly against the back of the shelf, as this helps prevent hot air from blowing directly onto them and ensures even drying.
Is It Safe to Sterilise Pump Parts in the UV Steriliser?
Silicone pump parts, including flanges, are safe to use in the UV Steriliser. It’s normal for silicone to feel slightly softer or more flexible after repeated sterilisation.
This can happen over time with UV light, steam, or hot water exposure and does not affect the safety or performance of the parts.
How Often Should I Replace the UV Bulb?
Over time, some internal connections may corrode, which could cause issues with the UV lamp. UV bulbs typically have a lifespan of around 9,000 hours. If the bulb has blackened or stopped working, it may also indicate that the steriliser itself needs replacing.
You can try replacing the lamp with one of the same make and specifications (these are usually printed on the bulb). Once you have this information, a suitable replacement can be found locally or online.
Which Replacement UV Lamp Works with My Steriliser?
The make and model of the UV bulb is usually printed on the bulb itself, either along the glass tube or near the base.
Once you have this information, you can find a suitable replacement locally or online.
How to Safely Remove the UV Bulb?
Here are the steps to safely remove and replace the UV lamp:
- Switch off the steriliser and unplug the power cord from the back.
- Gently rotate the UV lamp 90 degrees until it loosens, then carefully remove it.
- To install the new lamp, align it into position and rotate 90 degrees again to secure it.
Steam Steriliser & Dryer
your questions answered
How long does the process take with this sterilizer?
It takes 5-6 minutes to sterilize and there are 3 drying functions for 30, 40, and 50 minutes. the handy timer counts down to the cycle completion. the unit has an auto power-off function for added safety. 50-60ml water in the heating plate works well for 5-6 minutes sterilisation. if 90ml or more is put in most times, there can be a build-up of condensation inside the motor which means there’s too much water to fully evaporate before the unit switches to drying mode. drying mode is best at 50 minutes unless the surrounding air is very dry.
How do I descale the Sterilizer?
Here are some tips for keeping the ceramic heating plate clean:
After each use: Wipe the heating plate with a damp cloth or sterile/disinfectant wipes to prevent build-up that can burn onto the plate.
For light build-up: Cover the affected area with soapy water, leave for 30 minutes, then gently clean with a non-scratch plastic scourer. Absorb the water with a sponge and wipe away any residue with a clean cloth. Avoid harsh cleaners or metal implements, as these can scratch the plate.
Regular cleaning: Clean the barrel, lid, and racks regularly to maintain hygiene.
For stubborn, baked-on scale:
- Mix 20ml of white vinegar and 20ml of water on the heating plate
- Let it sit for an hour
- Use a sponge and gentle pressure to remove stubborn scale
- Afterward, wipe everything down with a clean damp cloth to ensure no vinegar or residue remains
How many bottles can the steriliser hold?
The steriliser holds nine (9) 270ml bottles plus accessories. The bottle height should be no higher than 16cm or 6.3” to fit.
Accessories can be added around the bottles if they fit loosely so the steam can circulate around them. The tray above the bottles holds the smaller items like collars and nipples and breast pump parts that need sterilizing (items should be no more than 60mm high).
How do I clean the filter?
The filter will very rarely need cleaning. if you need to clean the filter, open the screw on the filter cover, then slide the cover out. remove the filter and gently vacuum the dust off the grey side first, then check the other side and gently vacuum if needed. replace the filter and cover.
What are the dimensions of the steam sterilizer?
The height of the sterilizer is approximately 39cm / 15".
The width is 27.5mm / 10.5".
The depth is 19.5mm / 7"
Does the sterilizer fit bottles from other brands?
Yes it does, as long as the bottle height is no more than 16cm.
Caring for your Steam Steriliser
Additional Care Tips For Your Steam Steriliser
Just a few quick care tips to help you get the best out of it:
- Use 60ml of water per cycle — overfilling can cause issues. When there’s too much water in the heating plate, it won’t be able to dry properly. The extra humidity can also build up in the motor and may lead to a short or malfunction.
- Give it a quick weekly descale using equal parts vinegar and water — just let it sit for a bit, then rinse.
- If things still feel damp, try running an extra dry cycle or leave the lid slightly open after use to let moisture escape.
- And try to keep the steriliser in a room with low humidity, as excess moisture over time can affect the controls and internal components.
Bottle Washer
your questions answered
How Many Bottles Can the Washer Fit?
Our Bottle Washer, Steriliser and Dryer comfortably fits:
- Up to 4 wide-neck bottles, such as Minbie 270ml bottles
- Or up to 8 narrow-neck bottles
For best results, we recommend arranging items as follows:
- Place 4 wide-neck bottles in the main body section
- Hang up to 4 teats or breast pump parts on the internal hooks
- Place smaller items, such as dummies or collars, in the top tray
This layout allows for optimal water, steam and air circulation during the wash, sterilisation and drying cycles, ensuring everything is thoroughly cleaned and dried.
Can I Wash Breast Pump Parts in the Washer?
Yes, the Bottle Washer, Steriliser & Dryer does include an upper tray, which is perfect for smaller items like teats, dummies, valves, and breast pump parts.
This keeps everything secure during the wash so nothing drops to the bottom.
Which Powder and Water Should I Use?
We ONLY recommend using Finish Concentrated Powder Classic Original (fragrance-free) with your Minbie Bottle Washer. It is gentle on the system, highly effective, and only one teaspoon is needed per wash.
If you live in a soft water area, tap water is suitable. However, we strongly recommend using distilled water where possible, as it helps protect your unit and maintain optimal performance over time.
Where Does the Powder Go in the Washer?
The dishwasher powder should be placed in the base before adding the bottles and other baby feeding items. You can simply drop it in the base.
How Should I Clean My Bottle Washer, Steriliser & Dryer?
For full maintenance and cleaning instructions, please refer to pages 15 to 16 of your Minbie Washer Manual. These pages provide step-by-step guidance on safely cleaning the heating plate and interior of the unit.
If you notice mineral or milk build-up inside the washer, bottles may not come out looking completely clean. In this case, we recommend descaling the unit to refresh the internal water path.
To descale:
- Pour 60 mL of white vinegar into the base where you would normally add powder.
- Run a full wash or descaling cycle with no bottles or items inside.
- Once complete, run a second full cycle with fresh water only to thoroughly flush the system.
This simple maintenance routine can make a noticeable difference and helps keep your washer performing at its best.
Why Are There Scratches In My Water Tank?
Light surface scratches can occur over time with regular use and cleaning. These are usually cosmetic and do not affect the performance of your washer.
Please note that extended exposure to higher ambient temperatures can cause the plastic to become more brittle over time, which may make it more susceptible to scratching or cracking during use.
To help protect your water tank, we recommend:
- Avoiding prolonged exposure to direct sunlight or high heat
- Handling the tank gently during cleaning and refilling
- Using a soft cloth or sponge rather than abrasive materials
If you notice deep cracks or damage that affects the function of the tank, please contact our team and we will be happy to assist.
Bottle Washer Troubleshooting
Why Is My Washer Leaking or Leaving Residue?
If your washer is leaking or bottles are coming out with spots or residue, please check the following:
1. Detergent
Make sure you are using Finish Concentrated Powder Classic Original (fragrance-free).
Use 1 teaspoon per wash. If needed, you can reduce this to ½ teaspoon, especially if you notice excess residue.
2. Water Type
If you live in a soft water area, tap water is suitable.
If your water is hard, we recommend using distilled water to help prevent mineral build-up and spotting.
3. Descale the Unit
If residue continues, try descaling the washer:
- Pour 60 mL of white vinegar into the base where you would normally add powder.
- Run a full wash or descaling cycle with no bottles or items inside.
- Once complete, run a second full cycle with fresh water only to thoroughly flush the system.
If the issue persists after these steps, please contact our team at info@minbie.com.au and we will be happy to assist you.
Why Am I Seeing a “No Water” Error?
If your washer is displaying a “No Water” error, please check the following:
- Ensure the water tank is filled all the way to the MAX line. Even a slight underfill can trigger the alert.
- Make sure the water tank is seated properly and pushed fully into position.
- Once filled and correctly positioned, press Start again to resume the cycle.
- Make sure the lid is fully closed and nothing is in the way—this can also stop the cycle.
- Give the spray arms and filter a quick clean just in case there’s anything blocking them.
If the message continues after these checks, please contact our team and we will be happy to assist you.
General Queries
if you have any questions regarding minbie products, please get in contact with info@minbie.com.au or chat to our customer care team so that they can assist you.
What payment methods are accepted?
Paypal, Mastercard, Visa, American Express, Apple pay, Google pay, Venmo, JCB, Discover, Diners Club, Shop pay & Afterpay.